Cosmic Cuisine: Second Star on the Right Cinnamon Bread

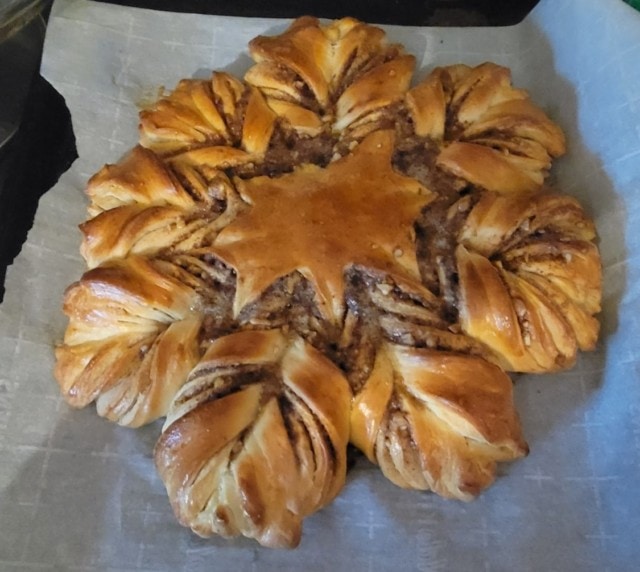
A new live-action Peter Pan movie, Peter Pan & Wendy, has arrived on Disney+! Being excited about this new take on a classic adventure, I’ve come up with Second Star on the Right Cinnamon Bread. This beautiful star-shaped cinnamon bread is much easier to make than you think but it’s every bit as delicious as it looks!
Second Star on the Right Cinnamon Bread

This scrumptious twist on the classic cinnamon roll will fill you with so many happy thoughts that you'll be able to fly right off to Neverland. In honor of Peter Pan & Wendy, streaming on Disney+.
Ingredients
Bread
- 3/4 cup milk
- 1 egg
- 1/4 cup sugar
- 1 (.25 oz) package of instant yeast
- 1/4 cup butter, melted
- 2 3/4 cups flour
- 1 tsp salt
Filling
- 1 Tbsp ground cinnamon
- 1/2 cup sugar
- 2.5 ounces walnuts, finely chopped
- 3 Tbsp butter, melted
Egg Wash
- 1 egg
Frosting
- 1/2 cup butter
- 1/2 cup packed brown sugar
- 1 tsp vanilla
- 1/4 cup milk
- 2 cups powdered sugar
Instructions
- Warm 3/4 cup milk in the microwave in 15 second increments until lukewarm, about 45 seconds.
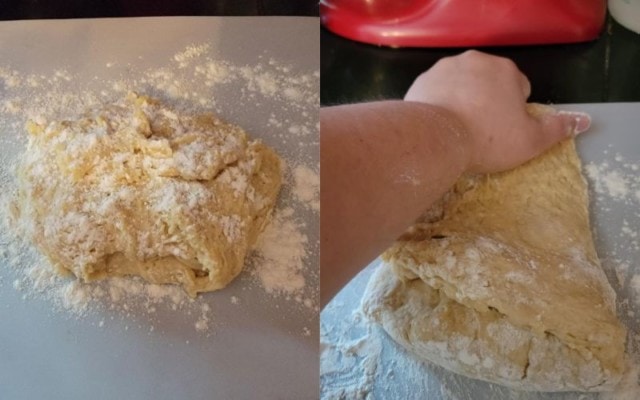
- In a large mixing bowl combine the egg, warm milk, 1/4 cup sugar, yeast packet, 1/4 cup melted butter, the flour, and salt. Stir until the dough just comes together.
- Scrape the dough onto a lightly floured surface. Knead the dough until it's smooth and elastic, about 7-10 minutes.
- Put the dough back in the bowl and cover. Leave it in a warm place to rise for 60 minutes.
- While the dough is rising prepare the filling. Chop the walnuts. Stir the walnuts, 1 Tbsp cinnamon, and 1/2 cup sugar together in a small bowl.
- After the dough has risen, divide it into 4 equal pieces. Shape the pieces into balls.
- Take one ball and roll it out into a 10 inch circle on a lightly floured surface.
- Melt 3 Tbsps of butter.
- Place the dough circle onto a parchment paper covered baking sheet.
- Brush the dough with melted butter.
- Cover melted butter with 1/3 of the filling (approximately 1/4 cup + 1 Tbsp). Leave about 1 inch of dough uncovered around the edges of the circle.
- Roll out the second dough ball into another 10 inch circle.
- Place the second circle on top of the first circle. Brush the second circle with butter and cover with 1/3 of the filling, leaving a 1 inch border.
- Roll out the third dough ball into another 10 inch circle. Layer it on top of the stack. Brush with butter and cover with filling, again leaving a 1 inch border.
- Roll out the final dough ball into one last 10 inch circle. Place it on top of the stack but leave it bare.
- Place a drinking glass in the center of the top circle. Push down gently to leave an indent but not cut the bread.
- Pinch all the way around the edges to seal the filling into the bread.
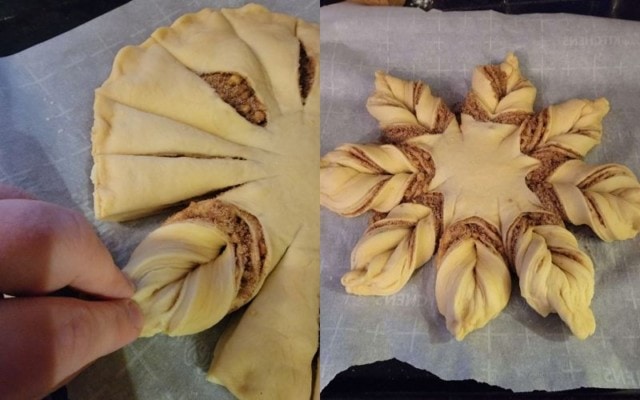
- Divide the dough into 16 equal strips (do NOT cut through the center). The easiest way to do this is to cut the circle into quarters (again, do not cut the center circle created by the cup), then divide each quarter into four strips.
- Now grab two adjacent strips (one in each hand). Twist the strips away from each other two full turns. Then press the ends of the strips together to make a point. Repeat until you have an 8 pointed star.
- Preheat the oven to 350°F. Let the bread rise on top of the oven for 20 minutes.
- Whisk an egg until smooth. Lightly coat the bread with egg wash.
- Bake for 25 to 28 minutes until golden brown.
- While the bread is cooking make up the frosting.
- Put 1/2 cup of butter into a sauce pan. Add 1/2 cup brown sugar. Heat on low, stiring constantly, until smooth.
- Remove from heat, add 1 tsp vanilla, 1/4 cup milk, and 2 cups powdered sugar.
- Stir until smooth.
- Frosting can be added to the whole loaf of just individual servings depending on your preference. Drizzle frosting over bread with a fork for nifty looking lines. If frosting got too thick while cooling just reheat for a few seconds until it's the desired consistancy.
- Bread can be enjoyed warm or cold! Each point makes a perfect roll and the center can be divided into two more servings.
This cinnamon bread is a yeasted dough
Yeasted bread can be a little intimidating to those who haven’t made it before. But it’s really not that difficult. The most important thing to remember is watching the proof (also known as rise). If the dough doesn’t rise enough (under proofed) then the bread will be dense and gummy. If the dough rises too much (over-proofed) the bread will collapse, resulting in a flatbread that doesn’t hold its shape.

A properly proofed dough will have grown to 20-50% of its original size. But that leaves a lot of wiggle room, so growth isn’t the best way to tell if the dough is properly proofed. A better way to tell if the cinnamon bread is fully proofed is to poke the dough. If the dough springs right back to its full height, it’s underproofed. If the dough doesn’t spring back at all then it’s overproofed. But if the dough slowly springs back to about half the height the dough is ready to bake.
The recipe may look complicated, but it’s not
I think my favorite thing about this bread is that it looks really difficult, the final product is just stunning to look at, but it’s actually pretty simple. Unlike some fancy-looking breads, there is no weaving or braiding, no complicated patterns to remember. Just twist and press! Sure, you have to layer the dough and filling a few times but that wasn’t all that hard.
The hardest part was rolling the dough into circles. As for making sure they were 10 inches, I just grabbed out a dinner plate and set it on top of my dough to measure when I thought it was big enough to check. As for the circle shape, I did my best to make the dough round, then when I placed the disk on the stack I stretched the dough to make sure it matched up with the rest of the stack. Easy!

As for those fancy-looking points, as the directions say, just twist and press. Start from anywhere on the circle and grab two strips next to each other. Twist them away from each other (left hand counter-clockwise, right hand clockwise) all the way around twice, then pinch the ends together to form one point.
Continue to work your way around the circle until all the strips have been twisted and eight points have been formed. I found it easier to keep turning the baking sheet as I worked instead of trying to reach around the circle. Once all the points are formed, gently tug them until they are about the same length (if they aren’t already). And just like that you have a beautiful loaf of bread that will dazzle anyone who sees it.
Let’s talk about pizza cutters, essential for this Peter Pan & Wendy-inspired bread
I will never forget a few years back when I read an article about unnecessary kitchen items. Some I agreed with (looking at you strawberry huller) but then the author included pizza cutters and I became convinced that they had never even been in a kitchen, let alone cooked.
I love my pizza cutter about as much as I love my parchment paper which, if you’ve read some of my other recipes, is really saying something. Pizza cutters are useful for so much more than just cutting pizza. And they are truly the only thing to use for cutting pizza.
A regular knife pulls as it cuts through things, which means that all your cheese (and the toppings with it) get ripped off if you try to cut hot, or even warm, pizza with a regular knife. But because a pizza cutter revolves on its axle, it’s like constantly making a new cut, not continuing a cut. It doesn’t pull so the cheese stays put.
The same holds true for anything else you’re cutting. Any raw dough, especially if it’s on a large sheet, is much easier to cut with a pizza cutter. Anything you want to make long straight cuts of can be cut with a pizza cutter. So do not eliminate your pizza cutter, no matter what some people might say about it being unnecessary.
Speaking of parchment paper
Okay, so I didn’t really speak of it, more like casually mentioning it. The point is, make sure to use parchment paper (the kitchen wonder tool) for this bread. The egg wash gives the finished bread a beautiful brown color but it also makes everything stick to the pan, bad. The only way to make sure that the bread can be taken off the pan without tearing it or otherwise ruining it is to bake it on parchment paper.
And speaking of transferring the cinnamon bread (I really was speaking of it this time!), make sure to support the bread when you take it off the tray. I suggest either a very large paddled pancake turner (which everyone wrongly calls a spatula) or using the parchment paper itself to lift up the bread and slide it onto the serving tray.
Suggestions for serving Second Star on the Right cinnamon bread
You can cut up your star bread however you like. I find that the best way is to treat each point as an individual roll, cutting it away from the main loaf at the base of the point and carefully separating it from the adjoining points with two more slices. The center is then large enough (depending on the size of the drinking cup you used earlier) to divide into four more servings.
I like how the star bread looks without anything on top of it so I offer the icing on the side. I like to use a fork to quickly flick streaks of icing on top of the roll before I serve it. Dunking the roll in the warm icing is also an option. Now my mother is of the persuasion that drizzling the icing over the entire loaf before serving using the fork method looks best.
If you don’t want the icing a sprinkle of powdered sugar fairy dust could also look nice and taste yummy. No matter how you decide to serve it, this cinnamon bread is guaranteed to give you enough happy thoughts to take flight, provided you can find some pixie dust.
Peter Pan & Wendy is streaming on Disney+. Are you interested in making your own star cinnamon bread? Let us know on Twitter or in the Cosmic Circus discord. And if you haven’t already, check out our review of Peter Pan & Wendy!


